
Create Bookings
Please note: You will need sufficient permissions in order to create bookings. Please contact an administrator in your account if you need increased permissions.
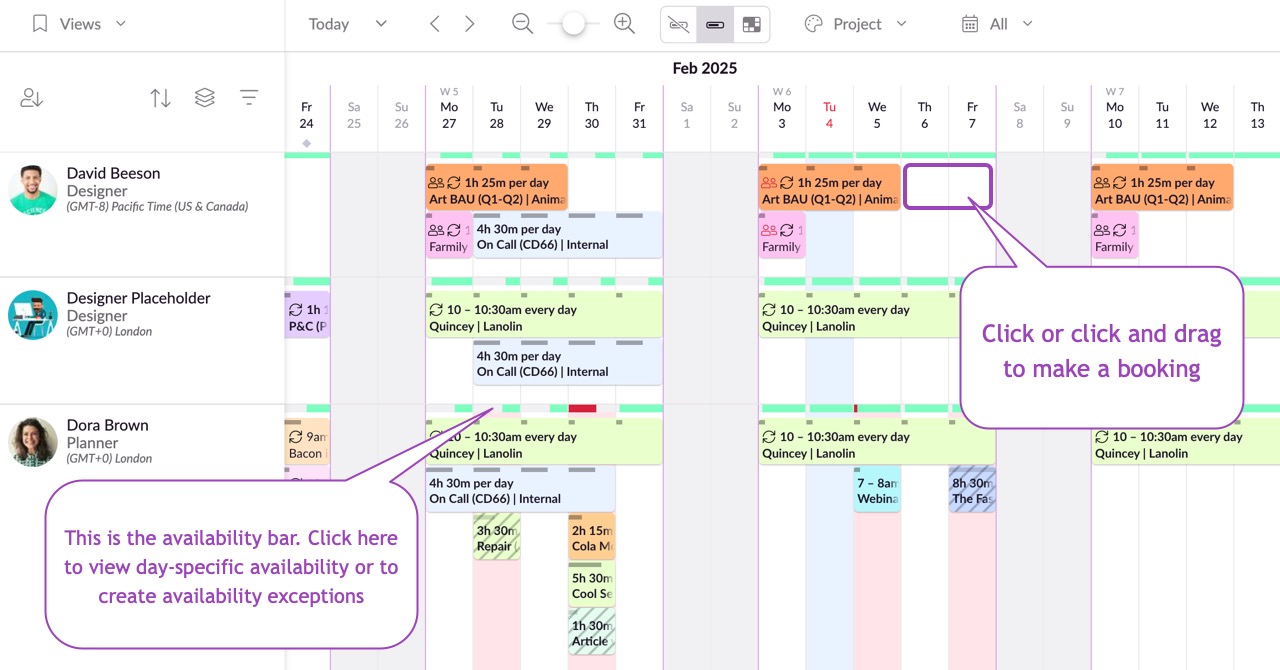
There are two simple ways to create a booking:
Click and drag across the days you want to book
Click on one day, then edit the dates if necessary
The Booking Form

People & Resources - The resource(s) you want to book. Here you can change the resource assigned to a booking, or to add multiple resources to the same booking.
Tip: You can also move bookings and time off from one resource to another by dragging them on the calendar, or copy and paste a calendar event by using SHIFT+drag.
Hours Per Day/Specific Time - There are two types of booking you can create:
Hours/Mins: If the job allows for flexible timing, create a duration booking (i.e. 4 hours 30 minutes).
From - To: - For bookings which need to take place at specific times, create a time specific booking (i.e. 9–10 am).
Add Repeat - This option allows you to set a repeating pattern for the booking. The default options are Weekly, Every 2 weeks, Monthly or Annually, or you can set a custom repeating pattern.
Tentative - This setting lets you specify whether a booking is tentative or confirmed.
Project/Client - Specify the Project or Client of a booking, if required. If you have sufficient permissions you can also create new projects and clients on the fly here, by selecting New Project or New Client in this drop down menu.
Activity Type - You can apply these customizable labels to projects and timesheet entries to organize various types of work, view by their color in the Schedule and Reports.
Billable/Non-billable - Each project has a billable status. When you create a new booking, the billable status will automatically default to that of any associated project. However, if you need to override that status for an individual booking, just click the Billable toggle to specify whether the booking is Billable or Non-billable.
Custom Fields - add single-select, multi-select or free text custom fields to your bookings. You can create, edit or delete custom fields in your Settings.
Details - Space for extra information or links related to the booking.
Booker - The person who made the booking. You can change this to another resource if you’d like to reassign responsibility for the booking. The booker and the resource for whom the booking was made will both see the booking on their Dashboard.
View Activity Log - an activity log which displays changes to the date, time, or duration of the booking, the people or resources assigned, as well as updates on linked projects and clients.
Guru tip
The Booking form will default to the duration that you last used, saving you time if you’re regularly creating bookings of the same duration.
Use Markdown in Details for cleaner notes and task lists
You can use Markdown in the Details field of your bookings to format text, create checklists, or add structure to your notes, making it easier to read and organize information.
Here are a few examples:
**Important:** Update the website by Friday
- [x] Write the press release
- [ ] Upload new images
- [ ] Schedule social posts
When saved, **word** will appear with bold text, *word* in italic, - as bullet points, and interactive checkboxes (if your browser supports them).
Details information is included in your Reports export.
When you download the Booking Data file, any notes or Markdown you’ve added to the Details field will be included.
Different Kinds of Bookings
Single day bookings
To create a single day booking, find the resource you want to book, then click on the date you want to make the booking for. The Booking form will be displayed; enter your booking details, then click Add Booking.
Creating Multi-Resource Bookings
You can quickly and easily create and edit bookings for a number of resources at the same time. Just click or click and drag on the schedule to create your booking as normal, then click in the People or Resource field on the New Booking form. Manually choose the resources you want to book, or click on the options menu to automatically select Currently Filtered resources, All People, All Resources, or to clear your selection. Then, once you've finished entering the booking details, click Add Booking.

Manually choose the resources you want to book, or click on the options menu to automatically select Currently Filtered resources, All People, All Resources, or to clear your selection. Then, once you've finished entering the booking details, click Add Booking.
Time Zone differences
Resource Guru displays time zone and DST changes in your Schedule. If you create a multi-resource booking which spans a change like this, you can rest assured that the meeting time will be accurately reflected on the schedule and in the daily schedule emails. For example, if you’ve scheduled a daily meeting for a team that is distributed across the UK and South Africa, and the meeting takes place at 9:30am UK time, your colleagues in South Africa would see the booking scheduled at 11:30am local time. When the UK moves into Daylight Savings Time, that booking would automatically change to 10:30am local time for attendees in South Africa, whilst remaining at 9:30am for UK attendees. This means that even with the complexity of clock changes, you can rest assured that your team will always see accurate booking times on the schedule.
Booking Limits
If you try to create a booking which would result in more than 10,000 days being booked, you’ll see an error message, since this is exceeding the maximum of bookings.
You will only hit this limit if your booking repeats for a very long time, for a lot of resources. The easiest way to bring your booking within the limit is to reduce the number of repeats. Alternatively, you can reduce the date range or number of resources on the booking.
Multi-day, repeating bookings
To create a booking that spans multiple days, click and drag across the days that you want to book and the Booking form will be pre-populated with the dates you selected.
By clicking and dragging over two or more days in a row, you’ll create a daily repeat booking (for example, a booking which occurs at 9am every day).
And if you have a number of resources who need to be booked for the same repeat booking, just filter to the relevant resources, create your repeat booking that either includes everyone, or use SHIFT+drag to copy the booking to your other resources.
The details and duration of the booking will be the same for each day, but you can split multi-day (non-repeat) bookings up later if you need to.
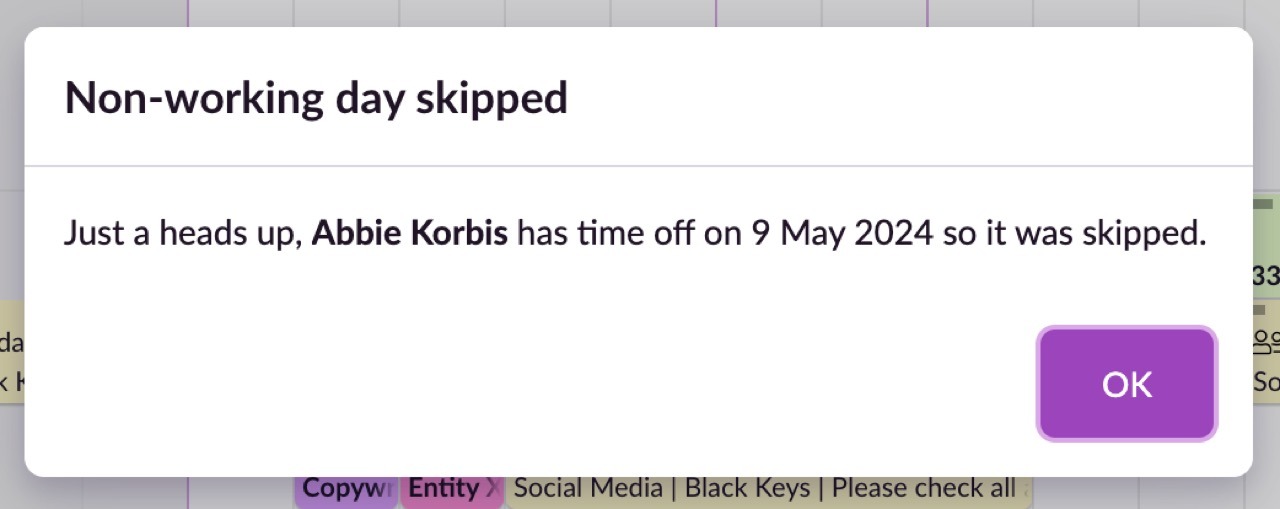
If you create a booking which spans any existing time off, the booking will automatically skip the time off just like it does with other non-working days, such as the weekend. You’ll see a notification like this one, just to give you the heads up.

If you create a repeat booking which clashes with any existing bookings, you’ll see a booking clash warning and will have the option to add the clashed booking/s to the Waiting List.
Tentative Bookings
Tentative bookings are different to waiting list bookings. When a booking goes onto the waiting list, it’s a confirmed booking that does need to go ahead; it just hasn’t yet been scheduled within someone’s availability. Tentative bookings on the other hand have not yet been confirmed; they are bookings which may or may not take place.

Tentative bookings are easy to spot on your schedule, because the booking container will be white and the colour of the project or client that the booking is for will be shown as an outline around the booking. If there’s no project assigned, they’ll appear grey.
On the Dashboard, tentative bookings will only be shown to the booker, they will not be shown to the people who have been booked. Once a booking is confirmed it will appear on the dashboard of both the booker and the person who has been booked.
Creating Bookings That Require Approval
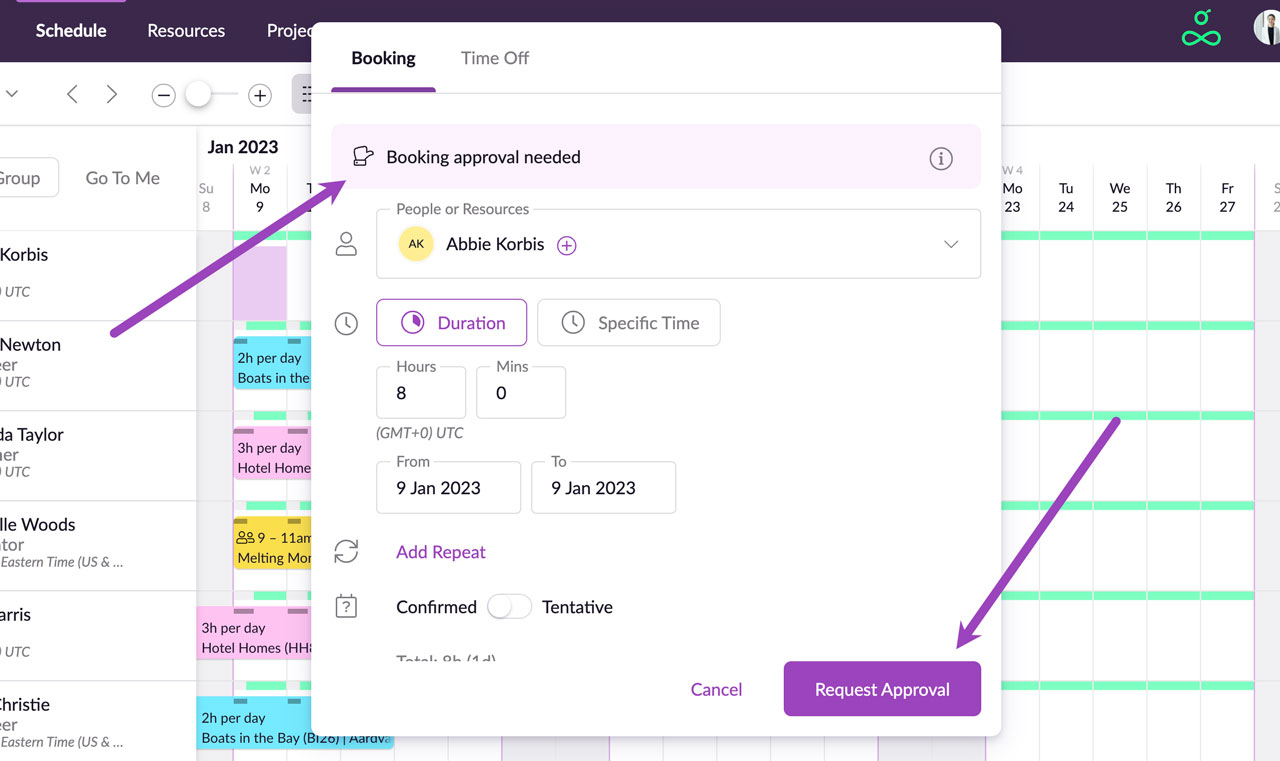
When the Booking Approval Workflow is enabled on your account, for bookings that require approval, an alert will be shown at the top of the booking form. Tentative bookings don’t require approval, but if a non-approver turns a tentative booking into a confirmed booking, the booking will then require approval.

Pending bookings are semi-transparent with grey text and a “Pending” icon. Declined bookings do not take up availability.
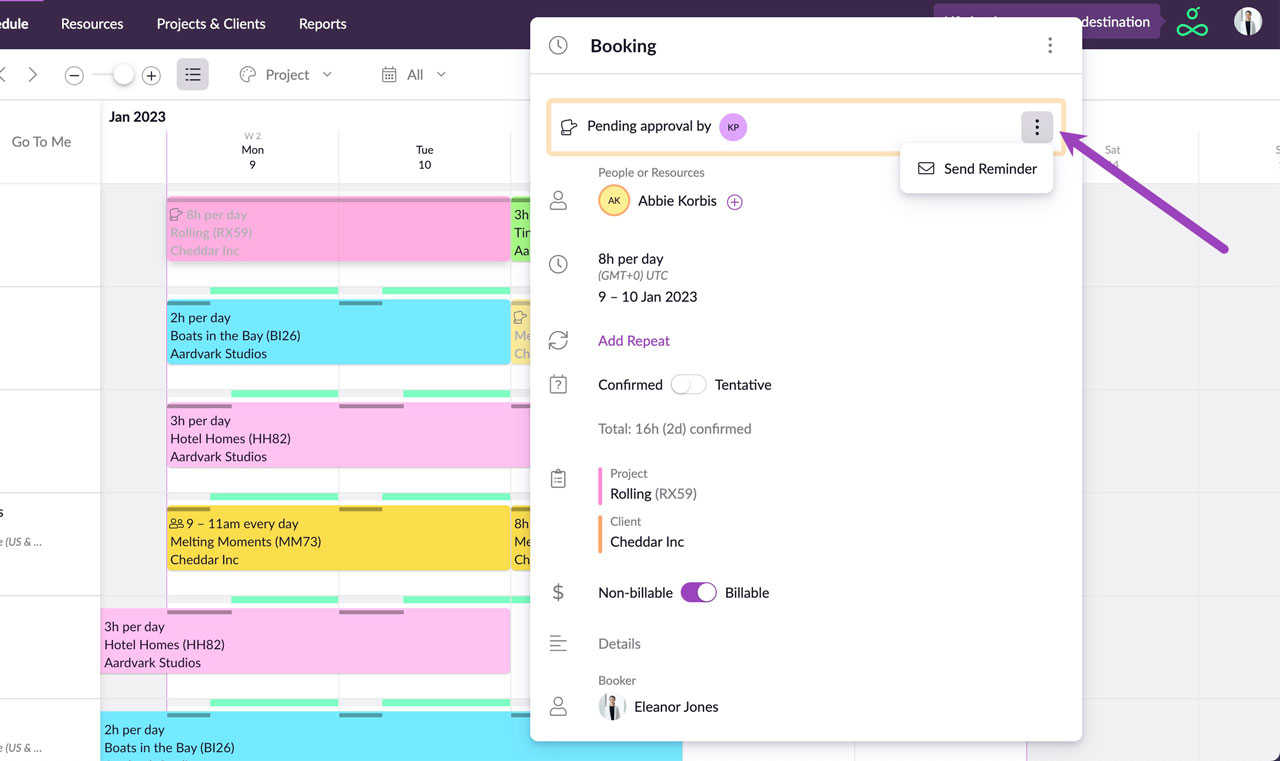
If required, a reminder can be sent to approvers by clicking the options menu on the booking, and then clicking Send Reminder.
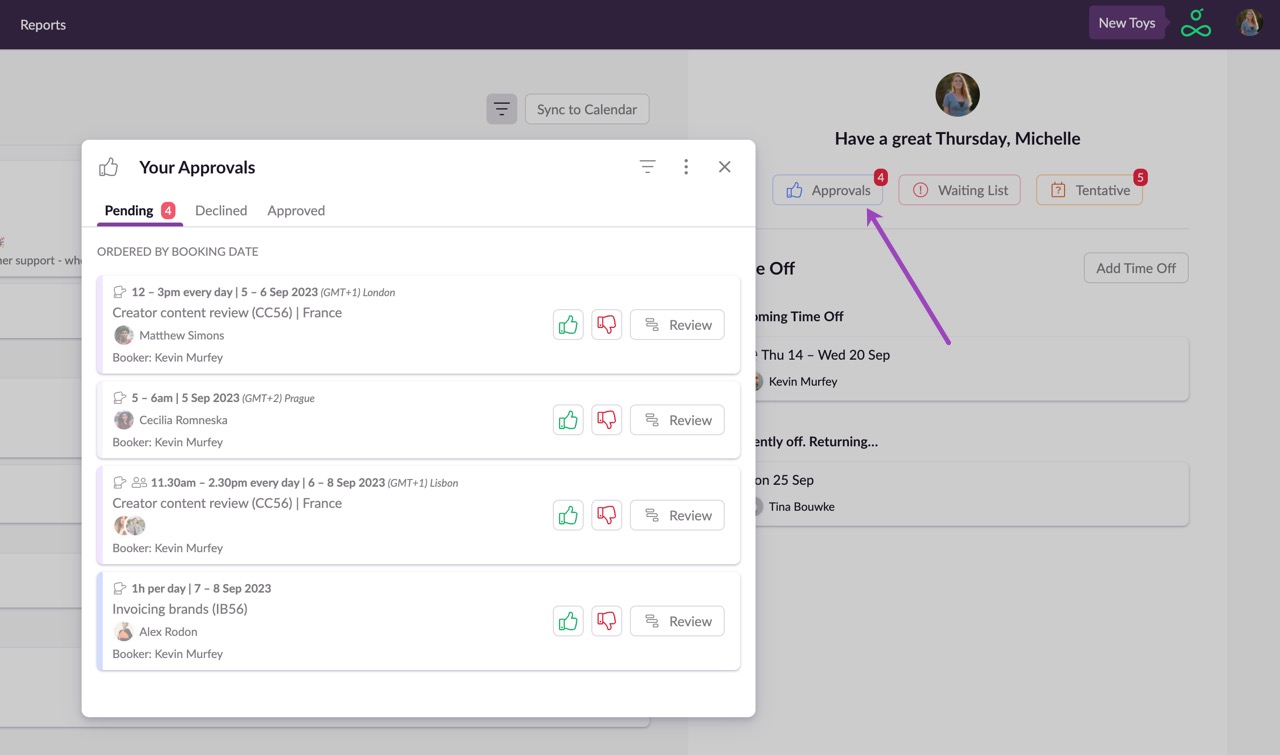
Bookers can keep track of pending requests over in their Dashboard. Reminders can also be sent to approvers from here.
Once a booking is approved or declined an email will be sent to notify the booker. If the approver gave a reason for declining the request, this will also be included in the email. Bookers can click on the link within the email to review all of their approval requests on their personal Dashboard.
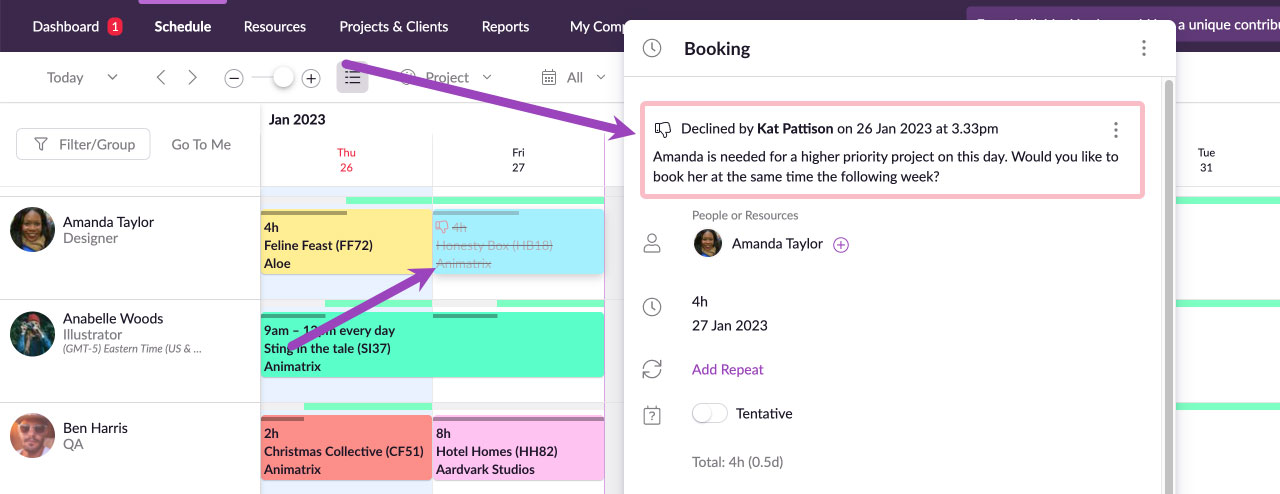
When viewing the schedule, declined bookings will appear semi-transparent with a strikethrough so it’s easy to pick out which bookings won’t be going ahead. The reason for the decline will be shown at the top of the booking form.
Editing Bookings
Click on an existing booking in the Schedule, and then click on any field to edit it. Click Save to save your changes or press Enter on your keyboard.
Editing Multi-Day Bookings
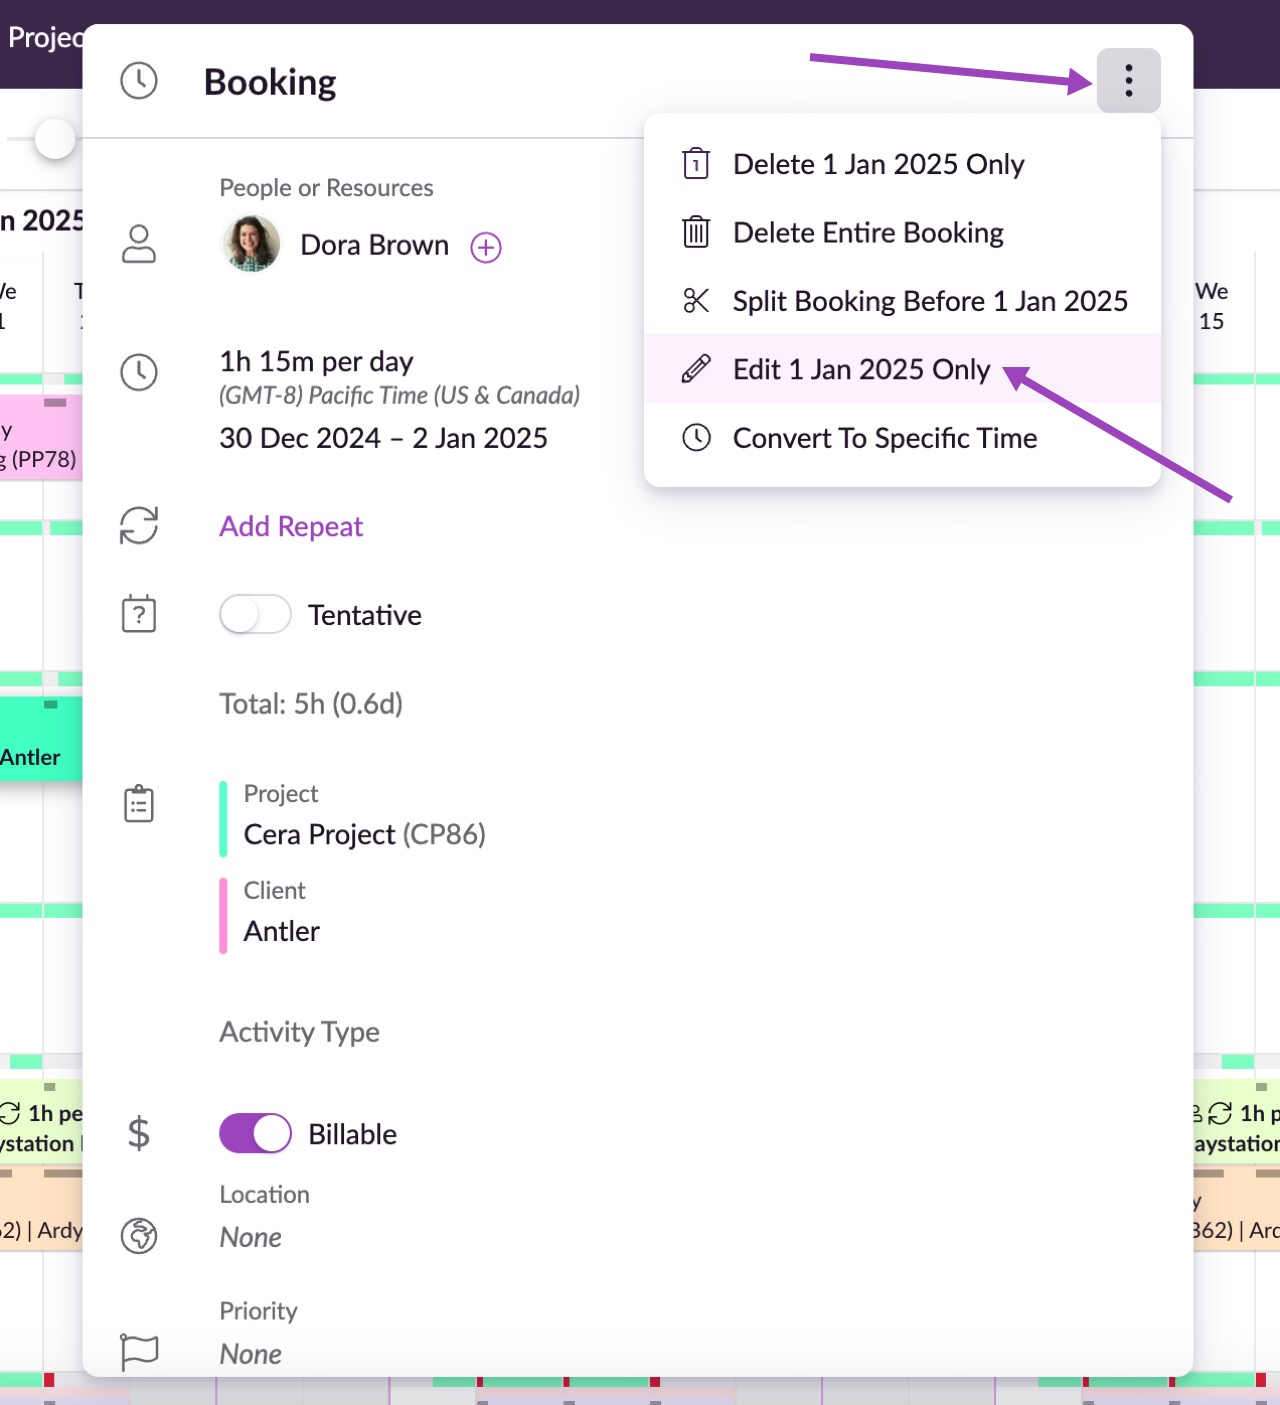
To edit a single day of a multi-day booking, click on the day you want to edit, then click the three dots in the top right corner to display the Options menu. From here, choose Edit [date] Only to edit just the date you clicked on.
Split Bookings
You can split multi-day bookings—which comes in very handy if you just need to edit specific parts of a booking.
Hover between the two dates where you’d like to split the booking. When the dotted line appears, just click and then choose Split booking, or Cancel to go back.
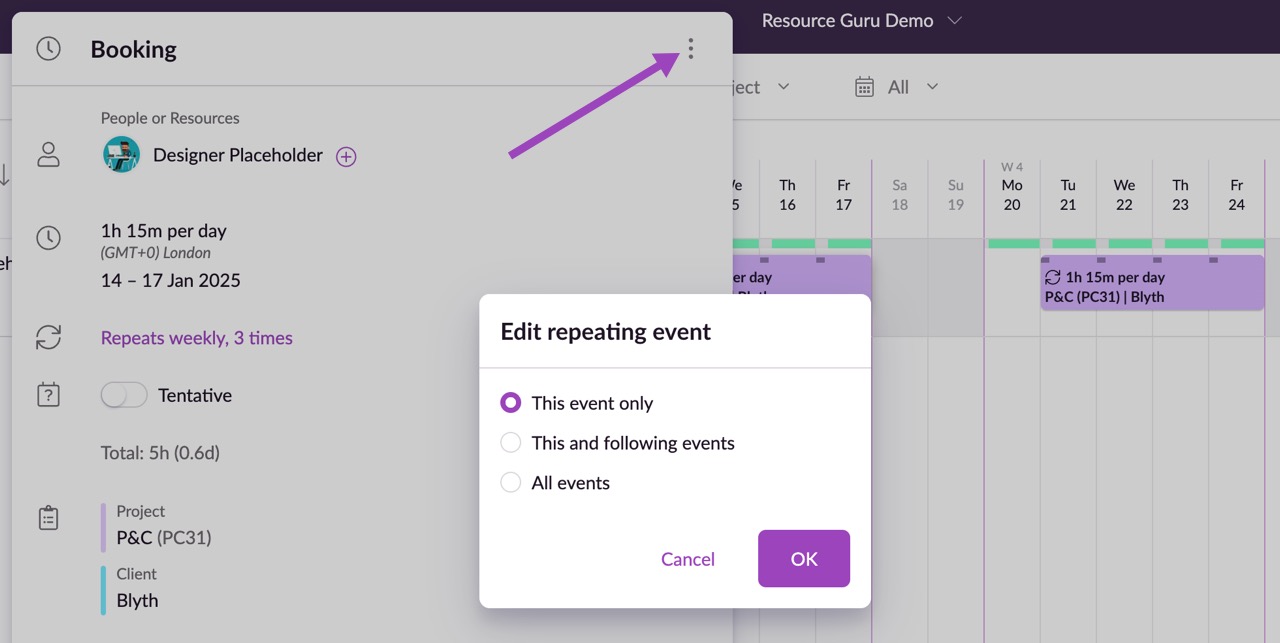
Editing Repeat Bookings
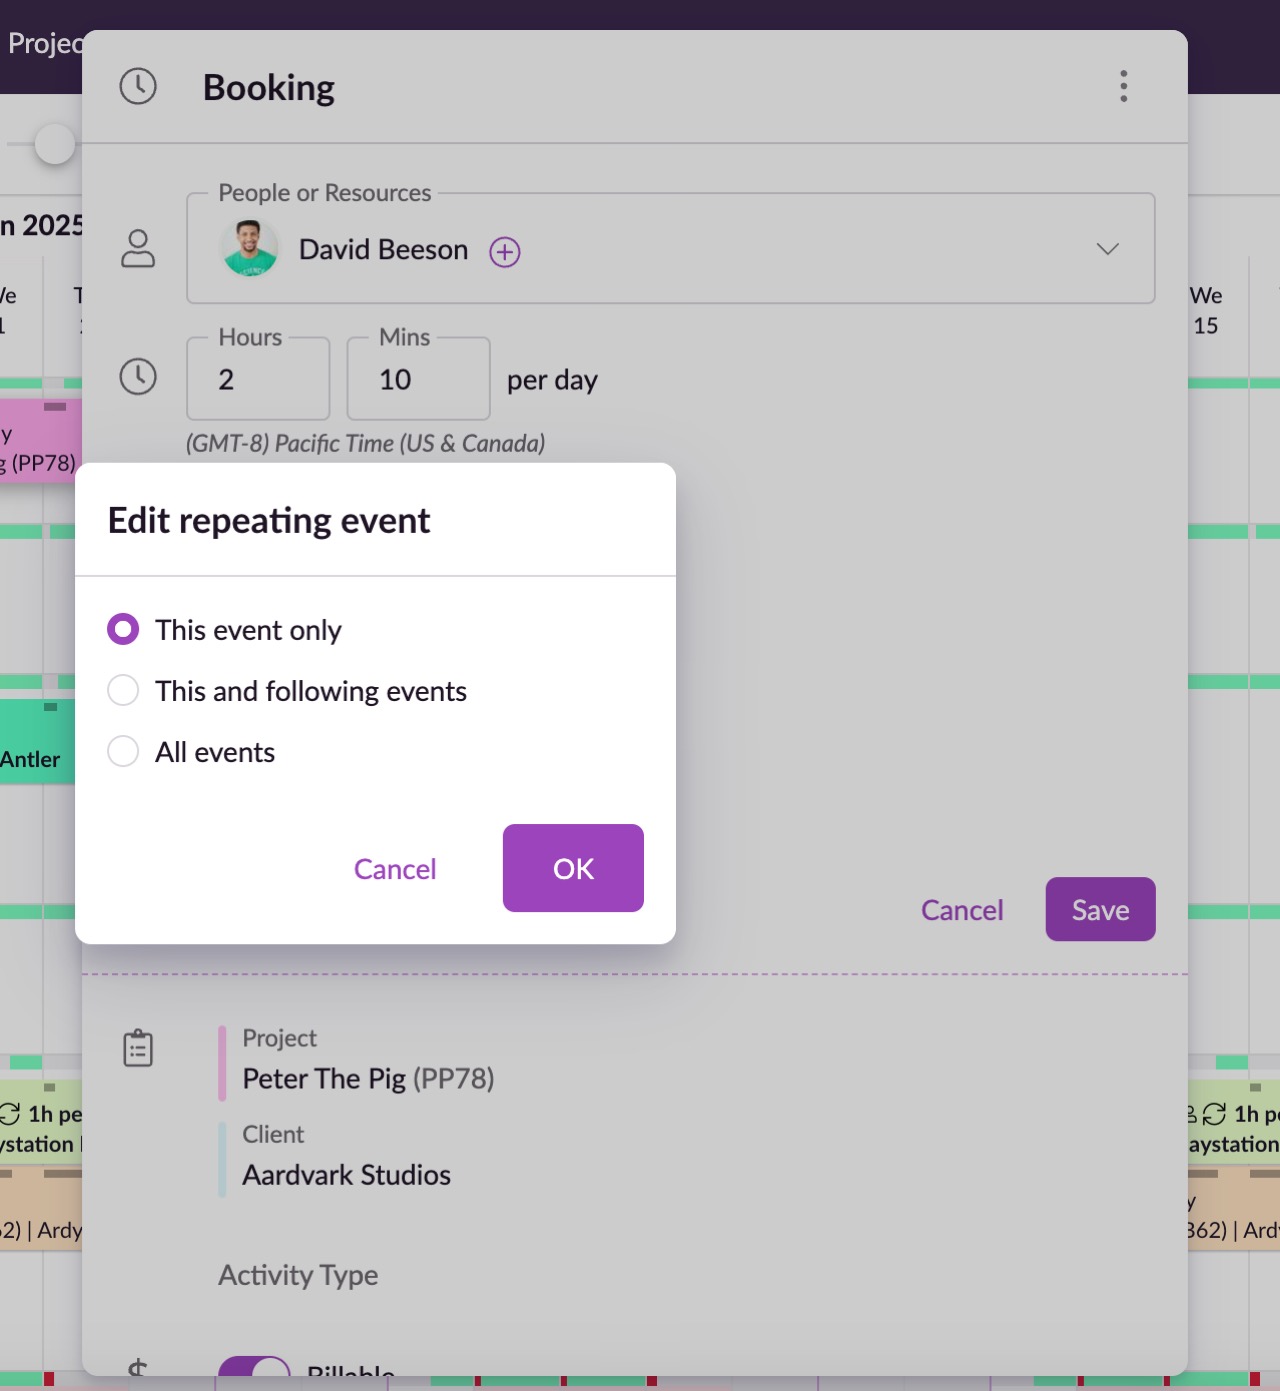
When you edit a repeat booking you’ll have the option to edit This event only, This and following events or All events.
Just like non-repeating bookings, you can still extend and contract repeating bookings.
Editing Multi-Resource Bookings
If you edit a multi-resource booking, the change will be applied for all of the resources who have been booked.
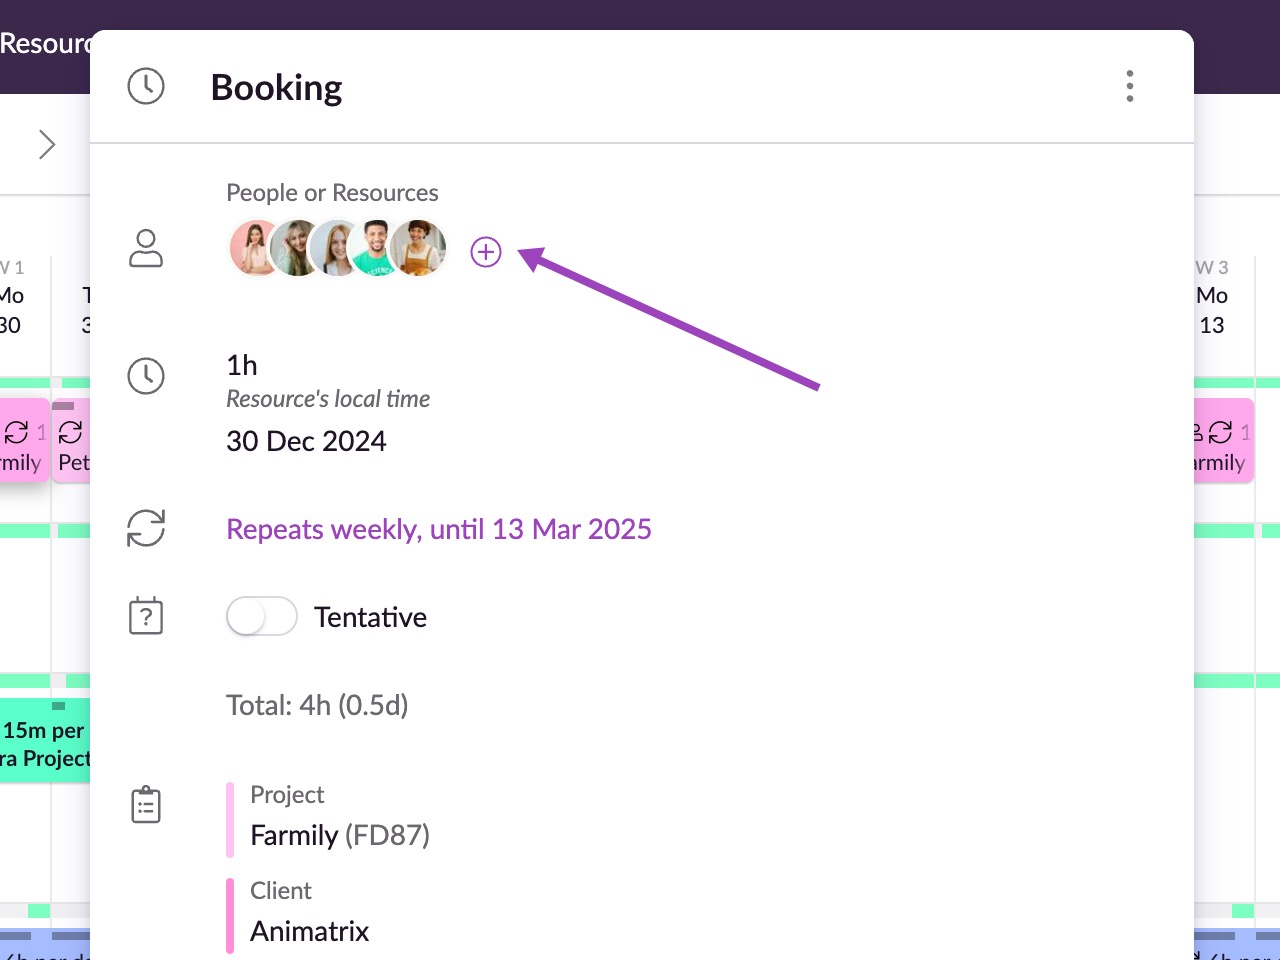
To add people or resources to (or remove them from) a booking, click on the booking and then click on the People or Resources field in the Booking window. From here you can remove or add people and resources.

For bulk changes, click on the options menu in the People or Resources window to clear the current selection or assign the booking to a specific group of resources, such as all people or all currently filtered resources.
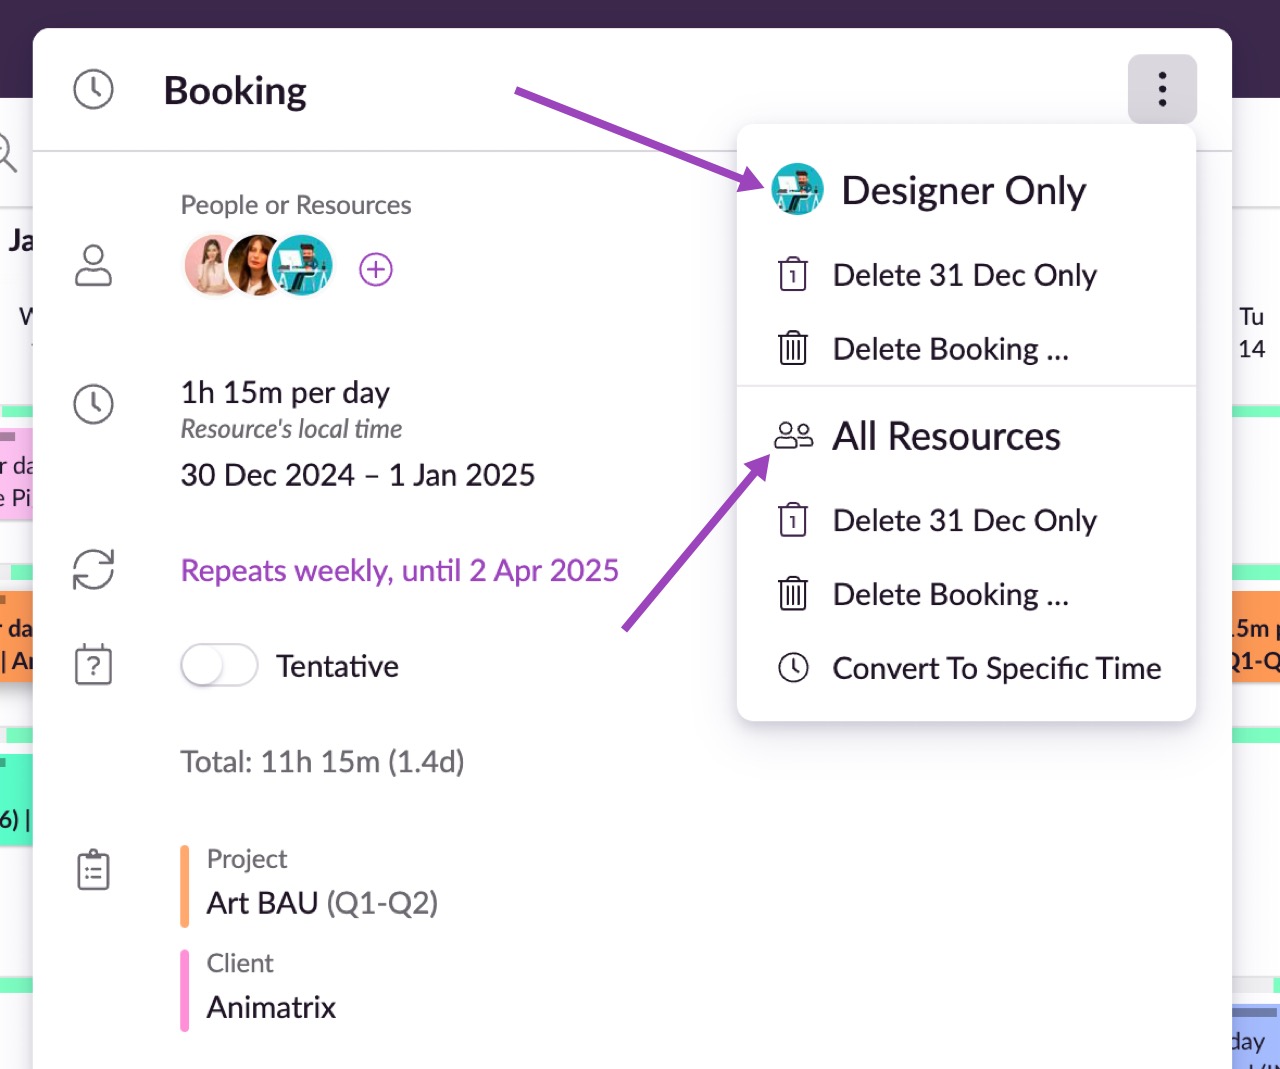
Click on the main options menu to delete a multi-resource booking. You can choose whether to delete it for the selected resource or for all resources. Within this menu you can also split the booking if it spans multiple days, or switch the booking to a specific time or duration booking.
Editing Bookings Which Require Approval
When the approval workflow is enabled and a non-approver edits a booking which has previously been approved or declined, the booking will go back into a Pending state, and will need to be approved or declined by either a designated approver or an Administrator in the account.
Drag to Move
Move a calendar event to another date or resource by clicking and dragging it to the new location.
Extend and Contract
To extend or contract the length of a booking by one or more days, hover over the end of the event until you see the resize cursor, then click and drag to set the new date range.
Copy or Duplicate Bookings
If you want to copy a booking, all you need to do is hold down the SHIFT key and drag that event to where you want to copy it. You’ll see the cursor change to a copy cursor as you do this.
Archived Projects and Clients
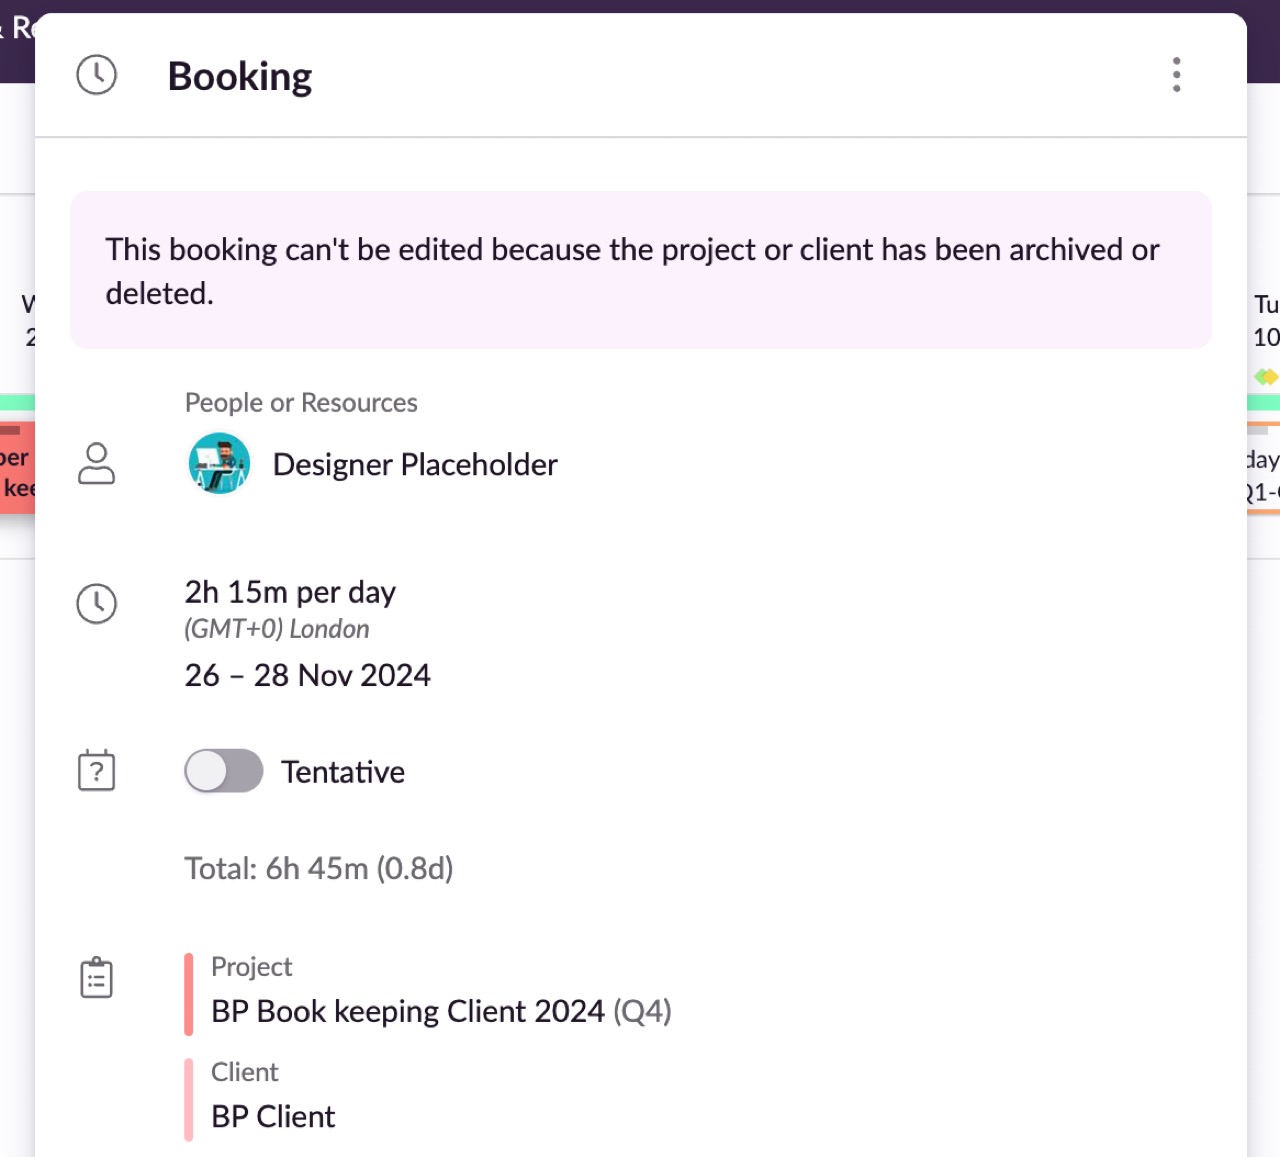
If a booking is associated with an archived or deleted project/client, you will not be able to edit it and you will see a notification saying “This booking can't be edited because the project or client has been archived or deleted”. However, you will still be able to delete it if necessary by clicking on the kebab menu (3 dots).
Guru tip
If you extend a booking and release over a weekend or non-working day, you will see the option to add the booking with overtime or add it to the Waiting List. If you add it with overtime, you can easily mark it as normal time using the overtime slider.
Deleting Bookings
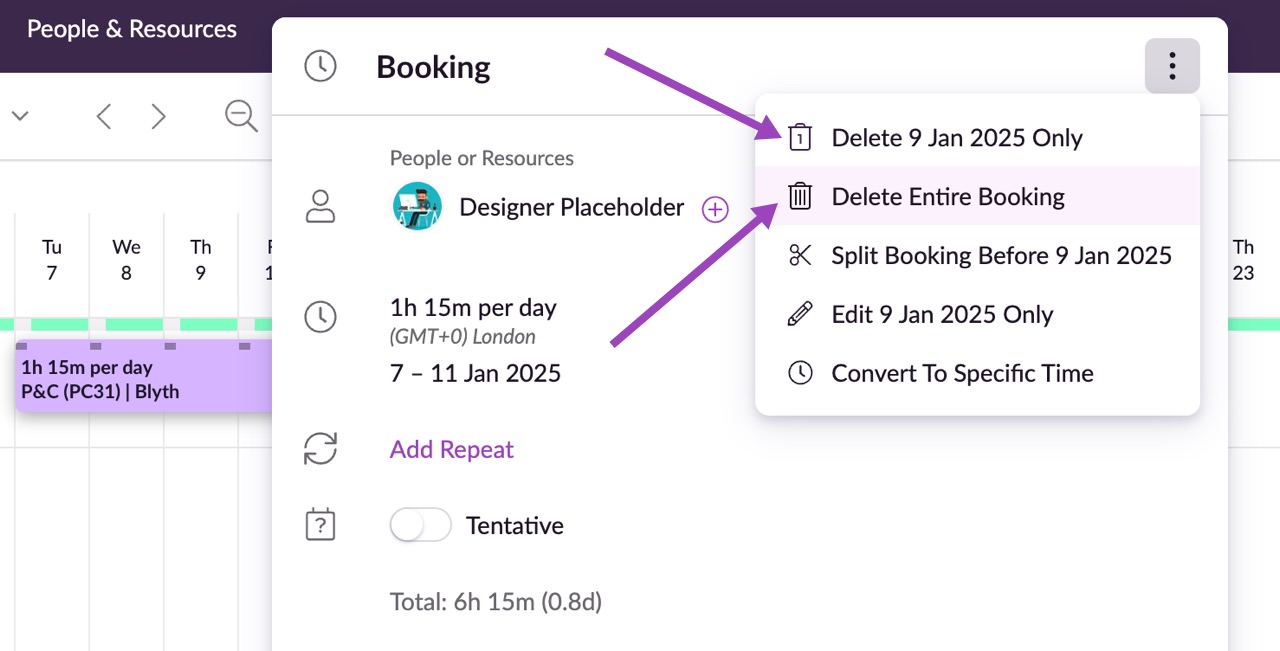
Click on an existing booking in the Schedule, then click the three dots in the top right corner to display the Options menu. From here, choose Delete Booking for a single day booking, or Delete Entire Booking for a multi-day booking. If you've clicked on a multi-day booking, you'll also see the option to Delete [date] Only to delete just the date you clicked on.
Deleting Repeating Bookings
Click on an existing booking in the Schedule, then click the three dots in the top right corner to display the Options menu. From here, choose Delete this event only, Delete This And Following Events, or Delete All Events.
Deleting Multi-Resource Bookings
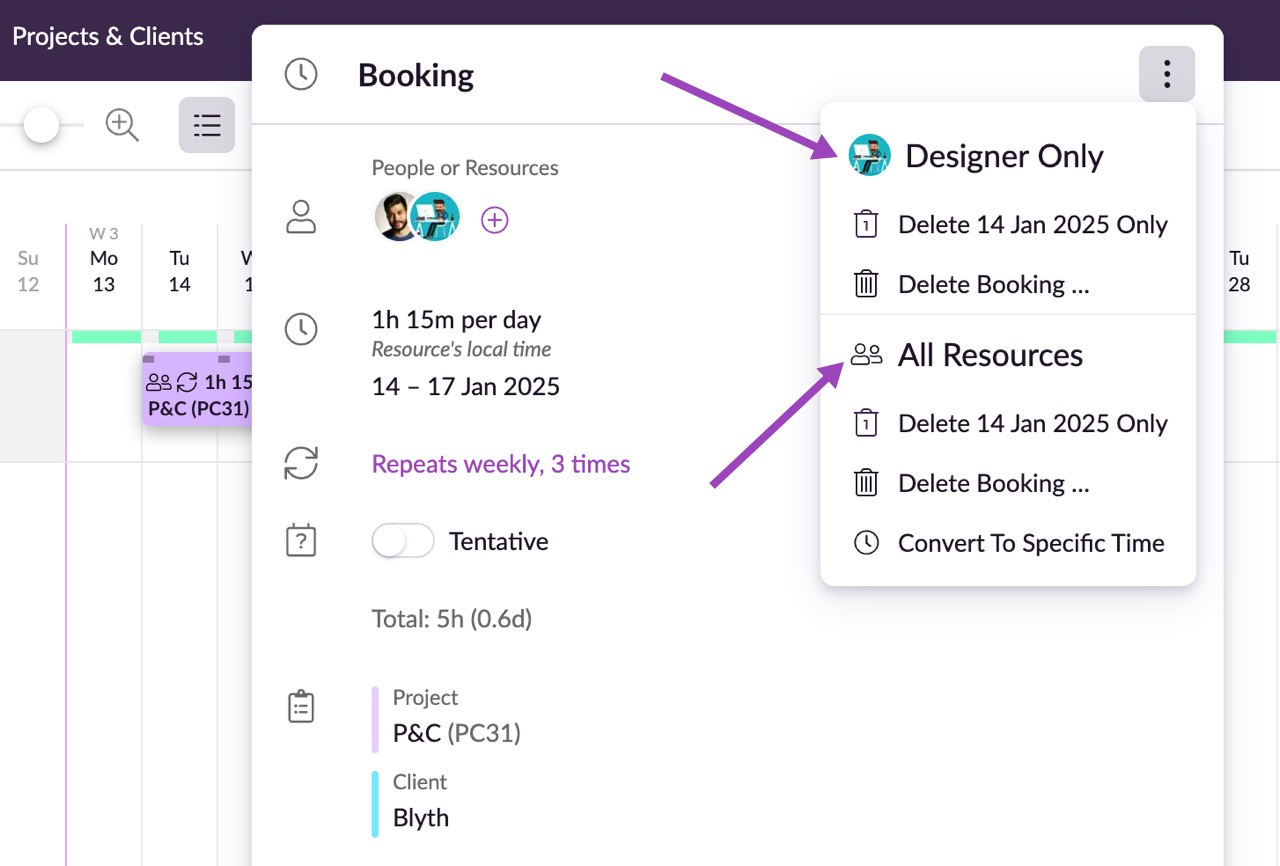
Click on the options menu of a multi-resource booking to delete the booking for a specific resource, or for all resources. If the multi-resource booking is also a multi-day booking, you’ll have the option to delete only the specific day you’ve clicked on, or the entire booking.